Maker Monday: Let’s try basic weaving (just follow this easy video)
We’re back again this week with another “Let’s Try” video from our friends at the Children’s Museum of Pittsburgh, as part of our rebooted Maker Monday series.
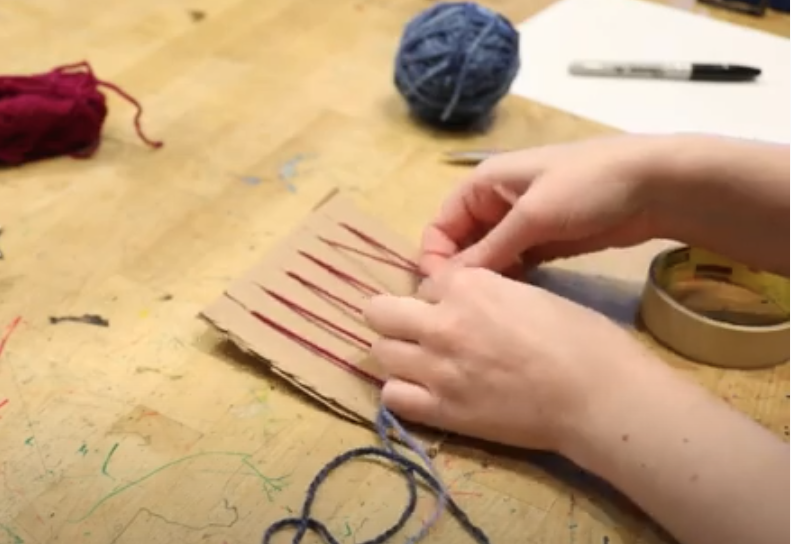
This week’s project teaches easy-to-follow basic weaving. You’ll find all the info on materials and instructions right here, and you can follow along on the video to learn all the steps.
A note to kid makers: Please work with a parent or caregiver on every project and always be very careful when using tools of any kind.
Maker Monday materials you’ll need:
- Cardboard
- Scissors
- Tape
- Yarn in two colors
Instructions for great ways to build with cardboard:
- Cut six slots on one side of a piece of cardboard.
- Repeat on the opposite side, making sure the slots line up across from each other.
- Tape the end of one piece of yarn to the back of the cardboard.
- Weave the piece of yarn through all of the slots to create parallel lines.
- Trim the excess yarn and tape the end to the back of the cardboard.
- Then tape one end of a piece of the second color yarn to the back of the cardboard.
- Use the second color of yarn to weave through the loom you’ve created.
- Weaving is done by pulling one piece of colored yarn (in the video, it’s blue) UNDER one of the pieces of the other color of yarn (in this video, it’s red) and then OVER the next piece of that color yarn.
- Then weave back in the opposite direction. (Quick tip as you weave: Wrap a small piece of tape around the end of the yarn to help make your weaving easier.)
See it all on this video (and check out other Maker Monday projects right here!):
Related Stories

Learn & Earn is open: Here’s how to get kids signed up

5 Pittsburgh-area programs for girls who want to make history

10 best April events for kids in Pittsburgh, from ‘Pete the Cat’ to a submarine escape room

Powerful summer learning and year-round programs are building career pipelines for students of color

The Greater Pittsburgh Festival of Books is coming in May: Here are the details
Maker Monday: Let’s Try Building With Cardboard!
Maker Monday: How to make beautiful paper beads
