Maker Monday: Let’s try addressing an envelope
It’s a new week and we’re back with a new fun and easy “Let’s Try” Maker Monday project, courtesy of our friends at the Children’s Museum of Pittsburgh. We’re glad to kick off the week by bringing you this free maker activity, which teaches a skill that kids will be glad to have: addressing an envelope.
Whether your kids want to send a handwritten note to a friend or a piece of artwork to a grandparent, the skill of addressing an envelope will come in handy. You’ll find all the details below, and your child can follow along on the video to learn each easy step. (With all Maker Monday projects, we always include this note to kid makers: Please work with a parent or caregiver on every project and always be very careful when using tools of any kind.)
Maker Monday materials you’ll need:
- an envelope
- a pencil
- a pen or marker
- a ruler or straight edge
- someone to write to!
Instructions:
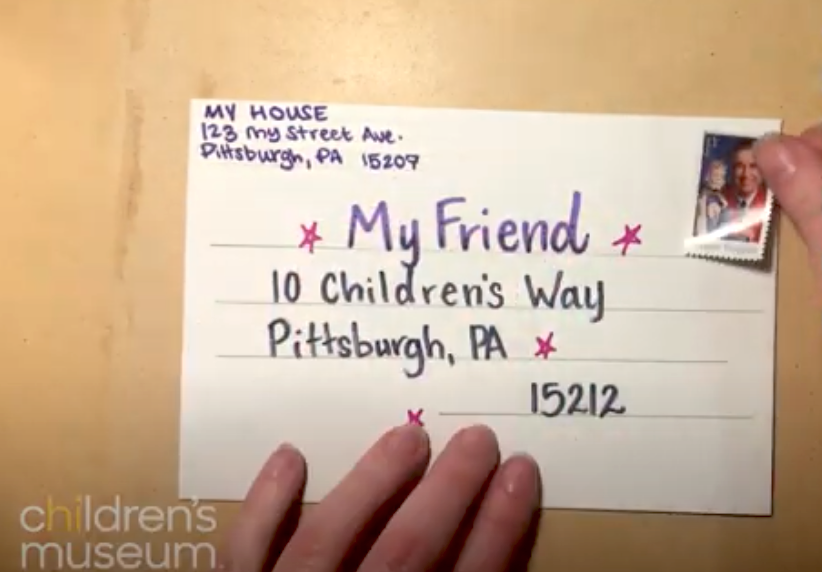
- Turn the envelope so the flap is against the table, pointing down.
- Use a ruler or straight edge and your pencil to lightly draw four lines across the front of the envelope, in the middle.
- The first line is for the name of the person you’re sending your card or letter to — you’ll include their first and last name.
- The second line is for the person’s building address (the street they are on and the number of the house or building).
- The third line is for the person’s city and state.
- The fourth line is for their ZIP code.
- Slowly and neatly pencil in the person’s name, street address, city, state and ZIP code.
- Carefully draw over your words with your pen or marker — make sure you can read them! (Quick tip: You can add some decorations to personalize your envelope. But be careful not to cover up the words, so the people at the post office can read them clearly.)
- Use your ruler or straight edge to draw three more lines in the upper left corner of your envelope.
- These lines are for your name and your address (you can put your ZIP code on the same line as your city and state). If for some reason this piece of mail needs to be returned to you, the post office staff will know where to find you.
- Add a stamp in the upper right corner.
- Once all the ink is dry, you can gently erase the lines you drew with your pencil.
- Put your letter or card or drawing inside the envelope and seal it. Now you’re ready to put it in the mail!
Want more at-home fun making beautiful things and learning new skills? Check out more Maker Monday videos from Kidsburgh and the Children’s Museum.
Related Stories
Maker Monday: Let’s try making pop-up cards

Maker Monday: How to create a homemade poetry card game
Maker Monday: Let’s make leaf print art
Maker Monday: Let’s make shaving cream prints
Maker Monday: Let’s try making sock puppets
Maker Monday: Let’s try making pennants
Maker Monday: Let’s try screen printing
Maker Monday: Let’s try ‘garbage gardening’!
